I stumbled upon a series of great infographics from the Georgia Libraries Tech Center Blog and since they allow for redistribution, I’ve posted them below. Check out the site for more good stuff http://galibtech.org


I stumbled upon a series of great infographics from the Georgia Libraries Tech Center Blog and since they allow for redistribution, I’ve posted them below. Check out the site for more good stuff http://galibtech.org
The longer we have the 3D printer, the shorter my patience grows.
We purchased a Cube 3 back in January of 2015. We actually had to wait for the Cube 3 to come out before getting our printer. We had originally planned on the Cube 2, but since it was being replaced by the 3 in a matter of months and because the 3 allowed us the option of printing in two colors, we decided to hold off and purchase the Cube 3.
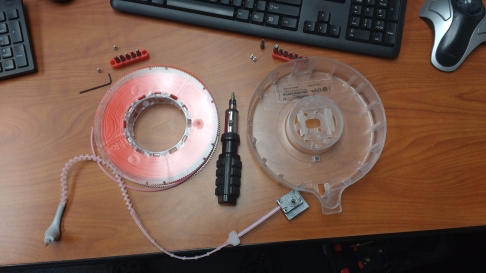
We it first arrived , I had a bit of a learning curve but that’s true for any first contact with a technology. I had to learn the ways of 3D printing and was frustrated on more than one occasion, mostly by having to manually level the bed. Mine are not hands that are attuned to fine motor skills. Every so often I’d run into jammed cartridge and got quite adept and taking the cartridges apart and putting ’em back to together. However, now it’s happening to every cartridge every other time we try to print something.
Am I just running into a bad batch of cartridges? Am I not taking good enough care of them? Is it poor design? Is the plastic just simply brittle? I’m not sure what the ultimate cause is. But what I do know is that I’m looking to buy a new printer and that I won’t buy another Cube 3. I can’t. They discontinued the printer last year. Perhaps that should have been a sign…
I had someone approach me with a little plastic candle holder that has been broken and glued together so many times that it was getting ridiculous. The holder has one leg that slips down between the window and the windowsill and another leg that lies flat on the sill, ending in a circle that holds the candle in place. This is for those fake electric candles, not the burning wax ones.
When I was designing a replacement in TinkerCad, I ran into a couple of interesting design flaws that I wanted to share. So here they are.
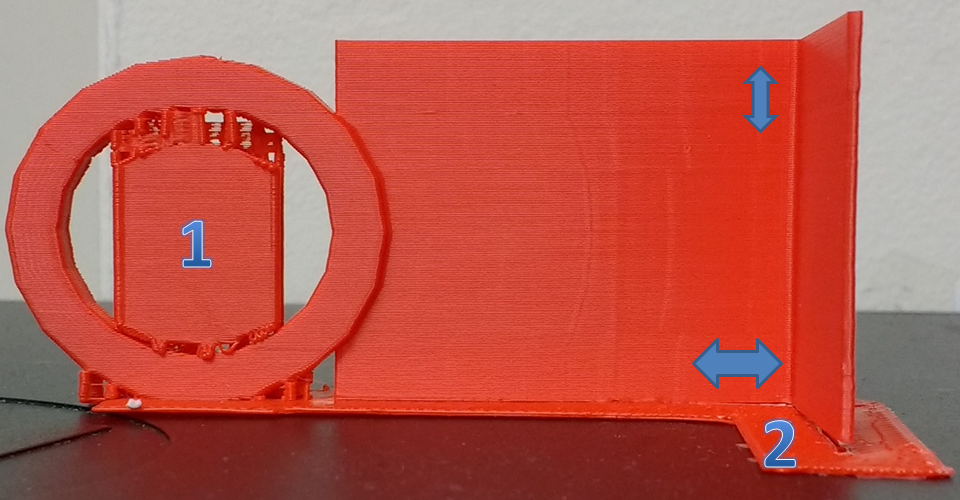
Additionally, the direction of the layers is important. I laid it on its side so that the layers are printed left to right and not up and down. I did this because on a prior print with the layers up and down it snapped off wherever I was bending it.
It still splits, if you bend it side to side, but the handling of the candle holder is usually done up and down. So I figured printing the layers side to side would afford the holder a better chance of survival.
And in case you’ve never seen a 3D Printer in action, here’s quick video of this object printing:
This is a mirco-post. I just wanted to stash this success story alongside all the other 3D printing posts. I don’t have anything more to say than what I said here:
When we got our 3d Printer, it wasn’t long before we realized that the printing part of the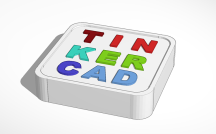 process is the easy part. Oh sure, there are little things here and there that make it difficult, but that only happens some of the time. What is difficult all of the time, is designing objects to be printed.
We decided to stress the importance (and coolness) of patrons getting familiar with CAD software so that they could see the 3d printing process soup to nuts. To support this, we have been pointing folks TinkerCad-ward, because it was browser-based and free. I had poked around a tad but really hadn’t the time to get into things. Until recently.
A few weeks back, my director sent me a link to an ALA article that detailed a program run by a Teen Librarian that helps patrons design and print their own bookmarks. The article didn’t have the step-by-step instructions, so I took it the next step and created the document myself.
Because it’s a lengthy process, I’m not going to recreate it here. In the stead, I shall give you the pdf I created.
In case you want to see a more details, here’s the original program details from Micheal Cherry, the Teen & Youth Librarian at Evansville Vanderburgh Public Library in Evansville, Indiana: 3d-printed-bookmarks
Happy tinkering!
A patron emailed me an object that he wanted to print on our 3D Printer.
He and his wife have a dog. They also have carpets on the second floor. So he got a baby gate to put on the bottom of the stairs to prevent the little guy from going (literally) upstairs.
However, he ran into trouble because of the railing on the stairs. There was a rounded part that prevented the gate from sitting firmly. So he went off to his CAD program and designed a part to help. Check out the slideshow below to see how things worked out.
It’s been almost 2 years since we go the printer but finally, patrons are starting to use it for functional items. It’s great to see!
Quick return trip to 3D Print Land…
Since Marvin (our 3D printer) has been busy as of late, the screen started squawking about the need for speed…no wait, sorry…the need for calibrating. Skipping it didn’t have an adverse effects for that particular print job but I didn’t want to ignore the message forever.
So when I found one of hose elusive free moments, I ran through the auto-calibrate function. And got told the The Print Plate was not Detected. Since I was staring right at the confounded thing, I knew Marvin was mistaken. I took sandpaper to the plate, since there were an increasing number of divots. I also washed the plate very thoroughly. But alas! neither worked. So I got in touch with support and here’s what they told me.
Clean the sensors and turn off any lights directly overhead, as they may be washing out the sensors.
And wouldn’t you know it, turning the light off worked and the plate, while it didn’t autolevel, detected the plate and allowed me the “fun” of manually leveling the plate.

The library has had the 3D printer for over a year and a half. Folks have long shown not only interest in but also wonder at the technology. Lately, though, interest has hinted at use. Actual functional use. So, I’m pleased to present the first success story of the Wilmington Memorial Library’s Cube 3 3D Printer.
A fellow made a reservation so that I could show him how it works and how to use it. It took exactly 3.14 seconds for me to realize this dude was way smarter than me. You see, his interest was to print thumb nuts “to hold secondary mirror mounting vane assembly in place within the main optical tube” for a telescope he had picked up. He had plenty of experience in CAD, so after showing him the printer and the software, I got the hell out of his way.
Check out his write up on the experience. It includes a very thorough, and technical, explanation as well as pretty pictures and even a video of the printer in action. Here’s the link: http://dreamlight.com/3d-printing-missing-thumb-nuts-to-refurbish-a-telescope/
 Until recently, I was only concerned with which parts of an object touches the print plate in regards to deciding whether or not supports were needed. Then this kid came in needing to use the printer for a project. Finally! Someone had designed something with the express purpose of using our printer. I was thinking that this success would be Marvin’s watershed moment. Then things got touchy. Well, not-so-touchy really.
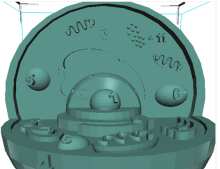
The dude was trying to print a 3D model of a cell. As in a human cell. It was an incredibly detailed design. All the major parts of a cell were there (I think, it’s been a number of years since I took biology).
I had to shrink the file a little, since it was larger than the print plate. At first I was concerned shrinking it would make us lose some of the details, since the printer can’t print details smaller than the width of the print head. But it turns out we had bigger things to worry about. Or, perhaps I should say smaller things.
The printer had laid down only two or three layers before I realized we weren’t going to be able to print it. Since the lad designed it as a sphere, the portion of the object that was in contact with the print plate was very small. As a result, there wasn’t nearly enough of the object glued to the plate to counteract the moving of the print plate. So very shortly the object was jostled free. In the screenshot below you can see it was, unfortunately, doomed to failure.
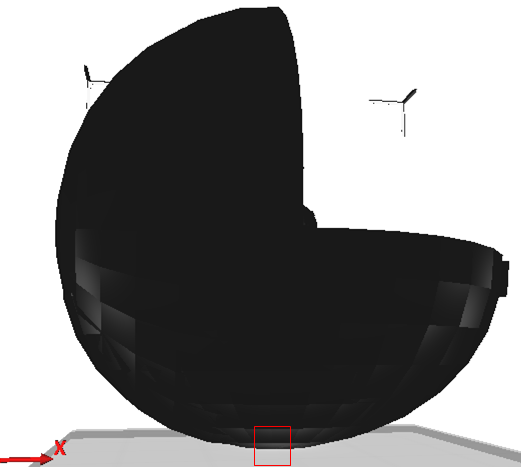
The part in the red square (heh) was all that was touching the plate
I recommended the lad go back to his CAD software and slice off the bottom of the cell to make it have a flat bottom, thereby allowing more of the object to come into contact with the print plate. Alas! ‘Twas not meant to be. The project was due the next day. His mom suggested they go get a big Styrofoam ball and carve that into a cell. Too bad, too, I was really excited to see the printer used for a school assignment. Perhaps next time…
Poor Marvin. He’s got every reason to be paranoid, everyone IS out to get him. Well, perhaps “ignore him” is a more accurate phrase.
As we turned the page on 2015, I struggled to recall that last time someone asked to use the 3D Printer. I oft see folks stop on their way to the holds shelf and check it out. They read the handout and pick up the objects on display. “Cool” and “awesome” are common reactions. But it’s been quite some time since someone actually asked to use the printer. So I was thrilled to get a submission a couple of weeks into 2016.
We ask for the .stl file so that I can run it through the Cubify software and see how long it will take to print. We only allow objects a 2 hour window. We’re flexible if it’s over by a little. But when I ran this lass’ file through it was set to 25 hours to print. While not usually that long, being over the 2 hour window is commonplace. So I resized the file to get it under 2 hours. Then I took a closer look and realized resizing may not be an option.
 The file was for a Network Cable Organizer. Anyone that’s worked on a server, will attest to the horror show that keeping cables organized can quickly devolve into. Since, cables are a specific thickness, shrinking the organizer pretty much makes the thing useless. I had to go back to the patron with the bad news. I hate not being able to help someone, so I racked my brain and realized the time limit may have more to do with our printer and not 3D technology in general. Would a higher end model be able to print the organizer is a more reasonable amount of time? I’m pretty sure it would. So while I can’t offer the patron another printer option, I realized I could point her elsewhere.
Amanda Goodman is a library extraordinaire. She is a woman of many talents. One of the many contributions to libraries she’s made is a map of 3D Printers in libraries. One of the quick wins librarians are so good at is simply collecting information. That’s what she’s done here: http://www.amandagoodman.com/3d/. It’s a self-contributing model. I did it myself. I emailed her a link to our 3D Printer page on the website and she added us. This is incredibly useful because each library makes their own decisions regarding their printer; what model to by, when it’s available for public user, how much it will cost the patrons, etc. Each pin on the map links to the page holding the pertinent information.
So I gave my patron Amanda’s handy link and told her to check out the other libraries in the area. Perhaps one of their models will be a feasible solution. If you’re a patron and are looking to enter the world of 3D printer, it’s an invaluable tool for you. If you’re a librarian and are looking to purchase a 3D printer, it’s an invaluable tool for you as well. This is an exciting time for libraries and this map is proof of that.
